Pages

Sep 4, 2011

E-T waveguide power divider

This is a 2-way power divider I made, which is used in a broadband feed net of a horn antenna array. Firstly, a E-T junction (figure 1a) can equal to a transmission line model like figure 1b.The junction is inductive.Here we assume that the impedance of L1 is Z0. So the S11 of this structure is not very good. For a perfect power divider, the impedance of L2 and L3 must be 2Z0, at the same time, the junction must not be inductive nor capacitive.
Figure 1 normal E-T junction

For the impedance, we can reduce the height of the waveguide to increase the impedance, while we can add a step in the junction which is capacitive and it can neutralize the inductance. So the final structure of the E-T junction is like figure 2. Figure 3 shows the S11 of this structure, the cutoff frequency of the waveguide is about 10.5GHz.
Figure 2 broadband E-T junction
Figure 3 the S11 of the structure

Now the impedance of L2 and L3 is 2Z0. We can use the impedance conversion method to convert the impedance to Z0. In the figure 4, I use Chebyshev impedance conversion method. The length of each impedance transformation segment is λ/4. The S11 of this structure shown in figure 5.
Figure 4 2-way power divider with Chebyshev impedance conversion
Figure 5 the S11 of power divider with Chebyshev impedance conversion

Aug 12, 2011

The Corner of a Waveguide

Some simulation results of the 90 degrees corner of the waveguide with CST Mcirowave Studio.

There are two kinds of waveguide corner, one turns in E plane, the other turns in H plane.

Figure 1 is the model of the E plane waveguide corner. The size of the waveguide is 14.5mm x 9.525mm.
Figure 1. The model of the E plane waveguide corner

I set a variable r1 in the CST and watch the S11 when the variable changes. The r1 is the inner radius of the corner. See figure 2.
Figure 2. The inner radius of corner

I also compare the round corner with the triangular corner. The model of the triangular corner is shown in figure 3.
Figure 3. The E plane triangular waveguide corner

I use the parameters sweep function in the CST to simulate the S11 which is related to the radius r1. The frequency range is from 10GHz to 15GHz. The results of the simulation is in figure 4. The worst one is the triangular corner, the dash line. And the S11 will be better when r1 increases until r1 is larger than 8mm.
Figure 4. The S11 of the E plane corner

The results of the H plane waveguide corner is similar. The figure 5 is the model and figure 6 is the S11.
Figure 5. The model of the H plane waveguide corner

Figure 6. The S11 of the H plane corner

Jun 15, 2011

Install the Wordpress on Fedora 15

In my previous post, I have setup the web server with the LAMP: http://rookiepeng.blogspot.com/2011/06/how-to-setup-web-server-on-fedora-15.html

We can run the wordpress on the server. The wordpress can be downloaded from http://wordpress.org/.

Before installing the wordpress, we need some configurations on MySQL. I use phpmyadmin to configure MySQL.
$ su
# yum install phpMyAdmin
The directory of the phpmyadmin is /usr/share/phpMyAdmin, while the apache directory is /var/www/html, so we need make a symbolic link:
$ su
# ln -s /usr/share/phpMyAdmin /var/www/html
Visit http://127.0.0.1/phpMyAdmin/ with you browser, login with root. Find "Privileges->Add a new user". Choose a name and a password for your wordpress database. The host is "localhost" and pay attention to selecting "Create database with same name and grant all privileges".

Extract the wordpress and copy all the files in wordpress directory to /var/www/html. Visit http//:127.0.0.1 and you can see a wordpress installing page.

Click "Create a Configuration File".

Then "Let's go!".

Type your database name and password, the host is "localhost'. Then click "Submit".

Do as the tips, copy the text into gedit and save as "wp-config.php". Copy "wp-config.php" to "/var/www/html" and click "Run the install". After a while, there will come out a welcome page:

Type your site name, administrator name, password, etc. Then congratulations! The wordpress has been installed successfully.

You can visit http://127.0.0.1 now. It will show you the default home page.

It seems everything is done, but there still are some problems. Firstly, you can't see the pictures when you visit the site from another machine. Then, you can't upload pictures when you post articles. You need do as follows:

Log in you wordpress with administrator account and go to "Settings->General". Find "WordPress address" and "Site address". Change them to your URL or IP. Then you can see pictures when visit from another machine.

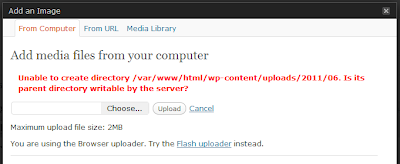
When you upload a picture, it will popup an error says: "Unable to create directory /var/www/html/wp-content/uploads/2011/06. Is its parent directory writable by the server?"

Run follow commands:
$ su
# cd /var/www/html/wp-content
# mkdir uploads
# chmod -R 777 uploads
That means creating a uploads directory and making it writable to everybody. You also need to allow httpd to have write access on the uploads directory in selinux. So run:
$ su
# semanage fcontext -a -t httpd_sys_rw_content_t '/var/www/html/wp-content/uploads'
# restorecon -v '/var/www/html/wp-content/uploads'
After all, your wordpress can work successfully. 

Jun 14, 2011

Enable SSH on Fedora 15

"Secure Shell or SSH is a network protocol that allows data to be exchanged using a secure channel between two networked devices. The two major versions of the protocol are referred to as SSH1 or SSH-1 and SSH2 or SSH-2. Used primarily on Linux and Unix based systems to access shell accounts, SSH was designed as a replacement for Telnet and other insecure remote shells, which send information, notably passwords, in plaintext, rendering them susceptible to packet analysis. The encryption used by SSH is intended to provide confidentiality and integrity of data over an unsecured network, such as the Internet."
--wikipedia

Enable SSH Daemon
Open gnome-terminal and type:
$ su
# systemctl start sshd.service
Now that it's started you'll need to keep it going in case you reboot your machine. Run the following command to have it start on-boot:
# systemctl enable sshd.service
After executing that command you will receive a message below:
sshd.service is not a native service, redirecting to /sbin/chkconfig.
Executing /sbin/chkconfig sshd on
Verify Firewall Setting
Check the port 22 is open in the firewall.

Test the Connection
I test the ssh on my Windows machine with SecureCRT. In SecureCRT, add a new connection and input your ip, user name and password in corresponding places.

The first time when you connect the ssh, you need to accept a host key.

After all are done, enjoy it!

Jun 11, 2011

How to setup a web server on Fedora 15 with Apache+MySQL+PHP (LAMP)

It had been three years since I first knew Linux. I had tried several different distributions like Ubuntu, Fedora and OpenSUSE, but I didn't have enough time to learn it in depth.

Now I have a plan to learn more about linux (Fedora), such as setting up a web server, starting a FTP server, doing some development, etc.

I had setup a web server successfully recently. The methods are as follows (my system is Fedora 15, there are some differences in other systems):

Firstly, install Apache, MySQL and PHP, run follow commands:
$ su
# yum install mysql-server httpd php
Now, you should have necessary packages installed. After installed, you must set a password for mysql root usr:
$ su
# systemctl start mysqld.service
# mysqladmin -u root password PASSOWRD_HERE
To run the apache and mysql services, enter the following in terminal. This should be done each time you want to use.
$ su
# systemctl restart mysqld.service
# systemctl restart httpd.service
The web server directory is "/var/www/html/". If you want the services to start with your OS, run the follows:

$ su
# systemctl enable mysqld.service
# systemctl enable httpd.service
At last, you must check the firewall to confirm the port 80 is open.


After all the above are done, open your browser and visit http://127.0.0.1, you can see a test page: